Best furniture in Russia IN THE OPINION OF EXPERTS
-
OFFICE IN MOSCOW:+7 (495) 255-0-125
-
PRODUCTION:+7 (495) 255-21-00
- 8:00-21:00 ПН-СБ (по МСК) Написать нам
Delivery and Assembly
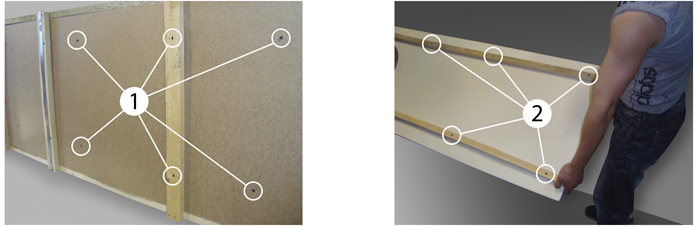
ATTENTION! For prevention of damage during transportation, tabletop packing provides rigid fastening of a product to packing using screws.
In order to avoid damage of the product during unpacking it is necessary to observe the following instruction strictly:
1) Unscrew transport screws located in the lower part of tabletop wooden packing (pic 1).
2) Open the wooden packing, lift the tabletop out.
3) Remove a protective packing film.
4) Unscrew screws and remove shipping laths (pic 2).
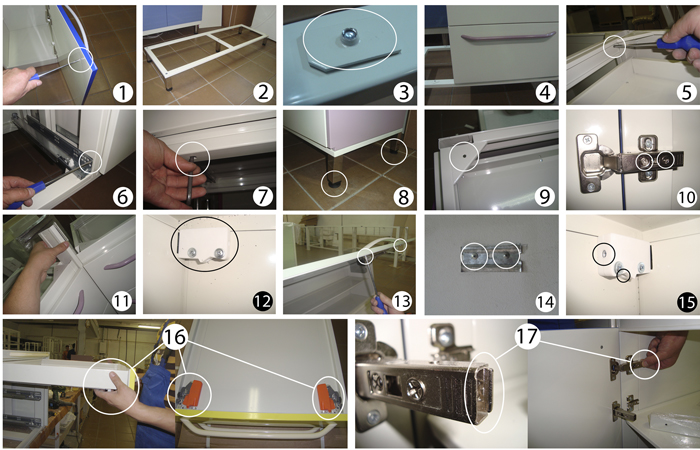
Installation instruction for "Budget” furniture series
I. Installation of floor modules.
1. Unpack furniture.
2. Thread the handles to facades of drawers and doors (Pic 1).
3. Thread the adjusting legs into the screw-threaded bores located on bottom corner plates of the module (Pic 2).
4. Place modules in necessary order, level furniture by rotation of adjusting legs (sake remove pallets and the bottom drawers of the furniture before adjustment for more convenience).
5. Connect the adjacent modules through holes in the top and bottom lateral profiles with assembly screws (Pic 3).
6. Fix tabletop on the furniture using self-tapping screws through holes in the top corner plates (Pic 4).
7. If necessary, make final adjustment of doors by rotation of adjusting screws on hinges (Pic 5).
II. Installation of angular module into the furniture set.
1. Connect the angular module to the adjacent one by means of the angular mounting strip (Pic 6).
III. Installation of suspended module.
1. Install the hanging mechanism to the module if it is not installed yet (Pic 7).
2. Thread handles in (Pic 8).
3. Determine place on the wall to attach the module.
4. Fix the metal hanging brackets of the module strictly horizontally (the recommended height of hanging is 1000 - 1100 mm from a table-top) (Pic 9).
5. Adjust module by rotation using adjusting screws (Pic 10).
IV. Installation and Removal of drawers and doors.
1. To remove drawer pull it out maximum and raise up (Pic 11).
2. To install a drawer made in the reverse sequence.
3. Press a closing plate to remove a door (Pic 12).
4. Reverse sequence is used for door installation.
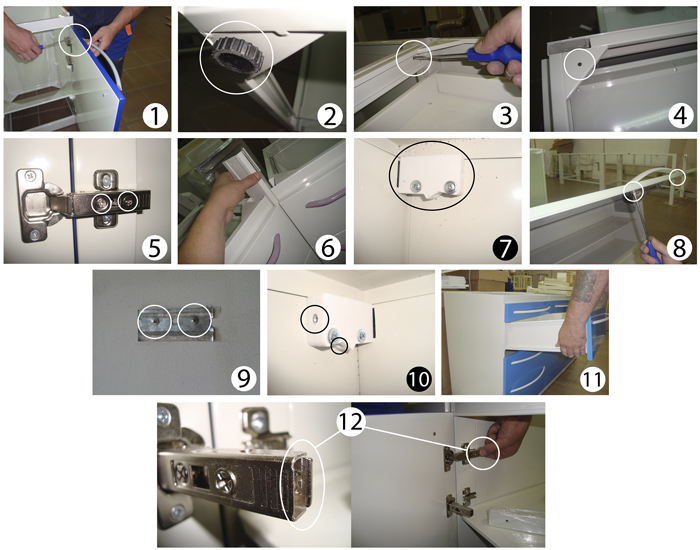
Installation instruction for "Econom", "Business" and "Luxury" furniture series
I. Installation of floor modules.
1. Unpack furniture.
2. Thread handles on facades of drawers and doors (Pic 1).
3. Assemble the furniture support (Pic 2).
4. Loose fixing plates of the support; arrange it lengthwise on the frame (Pic 3).
5. Install modules onto support in a needed order (Pic 4).
6. Connect the adjacent modules using assembly screws through hole in the top and bottom lateral profiles (Pic 5). While working with drawers of "Business" and "Luxury" series modules, remove slide rails before connection, after installation return slide rails back into place (Pic 6).
7. Fix the furniture set to the support rotating fixing plates by screws through holes located in lower part of support (Pic 7).
8. Level the furniture by rotating of adjustable legs (Pic 8).
9. Fix the tabletop to the furniture using self-tapping screws through holes in top corner plates (Pic 9).
10. If necessary, make final adjustment of doors by rotating adjusting screws on hinges (Pic 10).
II. Installation of angular module into furniture set.
1. Connect the angular module to the adjacent one using angular mounting strip (Pic 11).
III. Installation of suspended module.
1. Install the hanging mechanism to the module if it is not installed yet (Pic 12).
2. Thread handles in (Pic 13).
3. Determine a place on the wall where to hang the module.
4. Fix the metal hanging brackets of the module strictly horizontally (the recommended height of hanging is 1000 - 1100 mm from a table-top) (Pic 14).
5. Adjust module by rotating of the adjusting screws (Pic 15).
IV. Removal and installation of drawers and doors.
1. To remove the drawer pull it out completely and press the fixing buttons simultaneously (Pic 16).
2. To install a drawer do in the reverse sequence.
3. To remove a door, press a closing plate (Pic 17).
4. To install a door do in the reverse sequence.